Remove Protection from Microsoft Excel Sheet – In the previous article, I have mentioned about how to protect your Microsoft Excel file by assigning a password to it. Now in this article am going to explain your How to remove protection from Microsoft Excel Sheet. If you have put a password on your Microsoft Excel Sheet, then read the complete tutorial and then remove the password if you do not need it more. If you didn’t read the article of how to the assigned password to your Excel Seet then read it.
How to Remove Protection from Microsoft Excel Sheet
First, assign the password to your Microsoft Excel Sheet and then follow the steps mentioned below to remove it. This is a safe guide and it will work 100%.
- Open the Microsoft Excel Worksheet and then click on the File Menu which is at the top left corner of the window.
- In the File Menu, you can see many options to edit your Excel Sheet, Click on Info option.
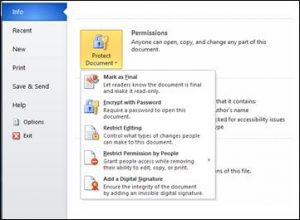
- In Info, you can see Protect Workbook which is used to protect your Excel Sheet by assigning a password to it.
- Click on Protect Workbook and then you can see many options like Mark as Final, Encrypt with Password, Protect Current Sheet, Protect Workbook Structure, Restrict Permission by People, and Add a Digital Signature.

- So click on the option you need to use your Microsoft Excel Sheet. But as we need to remove protection, then click on Protect Current Sheet.
- Now, you need to enter the password and then you can see Unprotect Workbook dialog box. If you click OK then your password will be removed.
- If you want to remove Password Encryption then click on Protect Workbook, Encrypt with Password.
- Now remove the contents of the Password box and then Click OK. Now save the file again.
So now you have successfully removed protection from your Microsoft Excel Sheet on your Windows Operating System.

